Winter Sales Event - Get $20 Off a New Smart Oil Gauge with code WINTER2025 - Shop Now

The Smart Oil Gauge’s New Configuration Process

We’ve recently updated the Smart Oil Gauge app with a new and improved configuration process! This process helps streamline the process of configuring your Smart Oil Gauge with a process that’s much more in-depth and easy to follow! In this blog post, I’ll be covering what it is, how to do it and much more!

Updating to the Most Recent Version

Updating to the most recent app version is important to ensure that you’re able to go through the process in the easiest and simplest way. The way you update your applications is a little different depending on whether or not you’re on an IOS or Android device. But they are both easy to do.

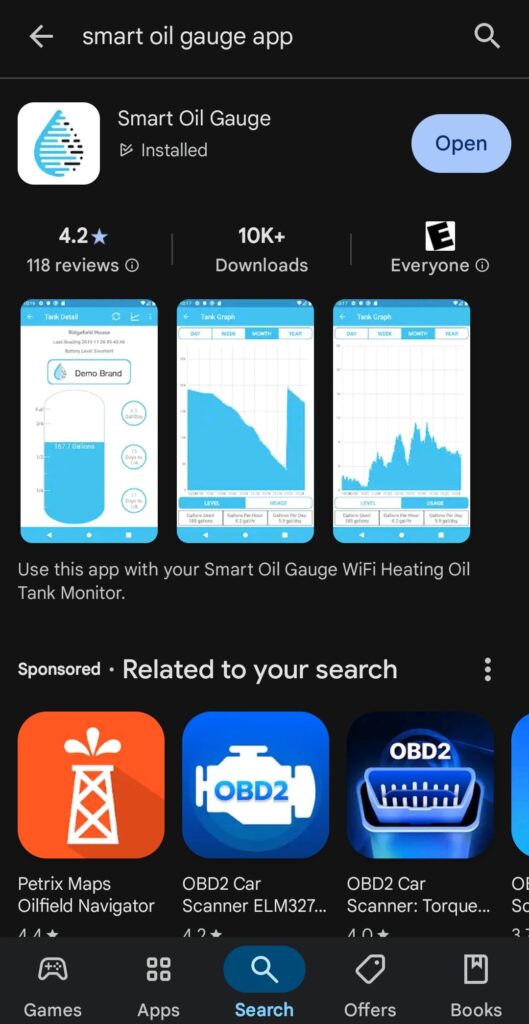
On Android devices, you can simply open up the Google Play Store and search for “Smart Oil Gauge”. You can do this by selecting the magnifying glass on the bottom hot bar of the app store. It will be in the middle of “Apps” and “Offers”. After you’ve typed in Smart Oil Gauge into the search, you’ll be prompted with our app! It looks like a blue and black water droplet with a white background. You can tell if the app itself is on the most recent version if the app says “Open” from the app store. Otherwise, it will say “Update”.

On IOS devices (IPhones & IPads), you can open up the apple app store and click on your profile on the top right. If you scroll down in this section, you’ll see what apps you have installed that will need to be updated. From here, you can see if the Smart Oil Gauge app is listed there. If it isn’t, then go ahead and open the app! Otherwise, you’ll have to update the app!

Starting the Process

If you’re a new user and you’ve just made a fresh account, the app will take you to a screen that says “My Tanks”. If you don’t have your Smart Oil Gauge setup yet, you’ll see that it says “No Tanks Yet”. This is perfectly fine! What you’ll need to do from here is click the wrench/gear icon on the top right of this screen. It will then take you to a screen that says “Tools” and “Account Settings”. But you’ll notice that in the middle it says “Connect Sensor”. You’ll want to click on that to start the process!

Upon selecting “Connect Sensor” it’ll take you to a screen that asks you to have your WIFI password handy as well as having physical access to the sensor. It’s easiest to do this process with the gauge off of the tank. I recommend starting this process before installation. This will make the overall process more comfortable and easy to do!

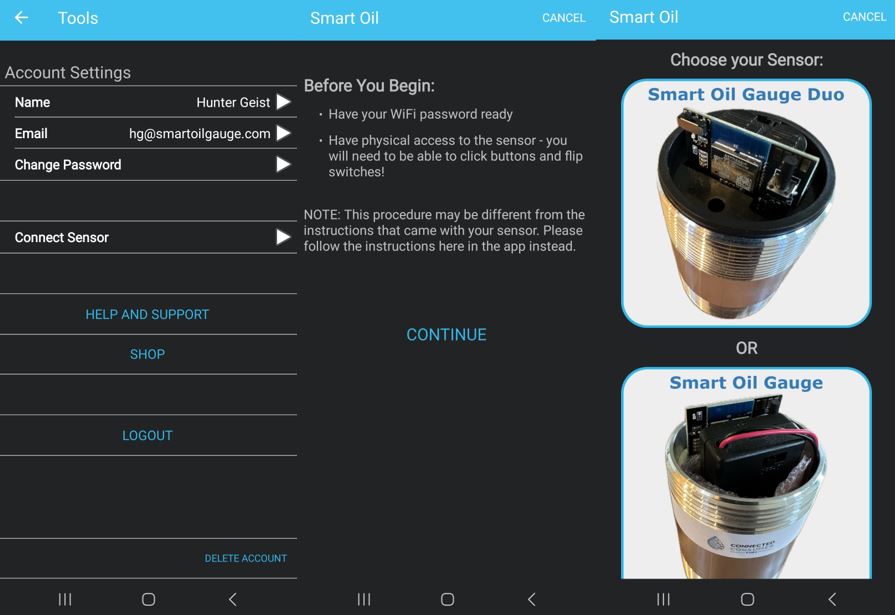
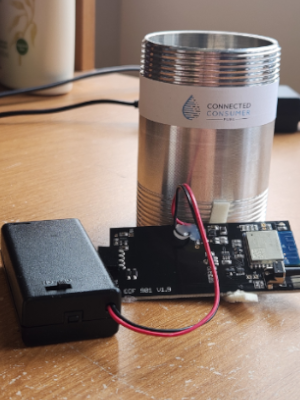
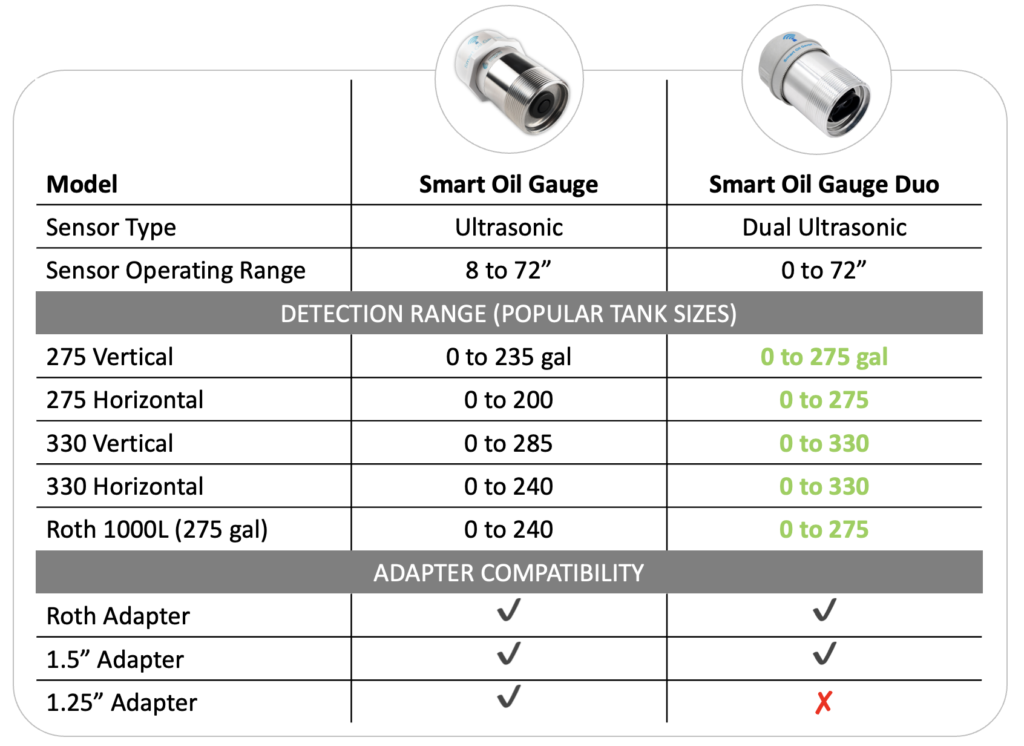
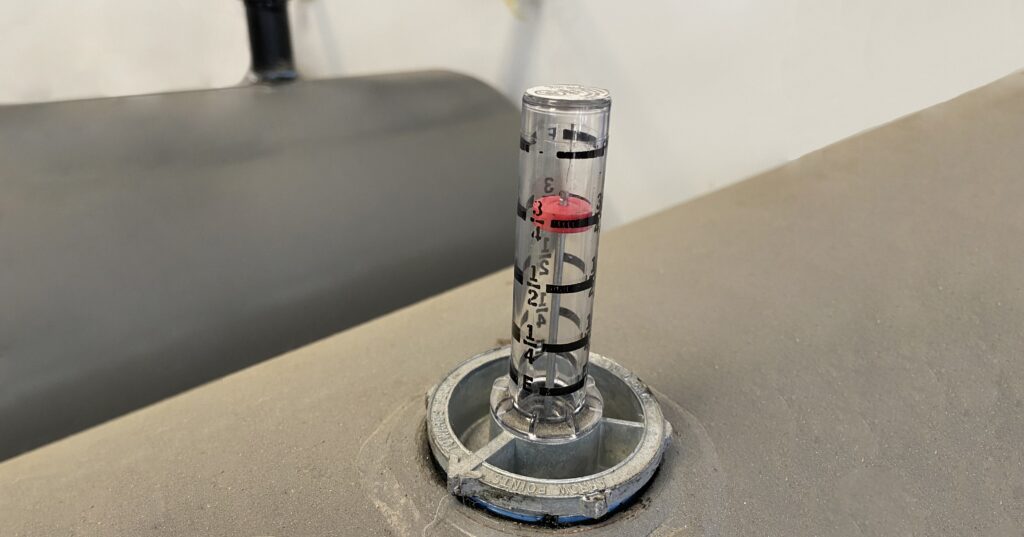
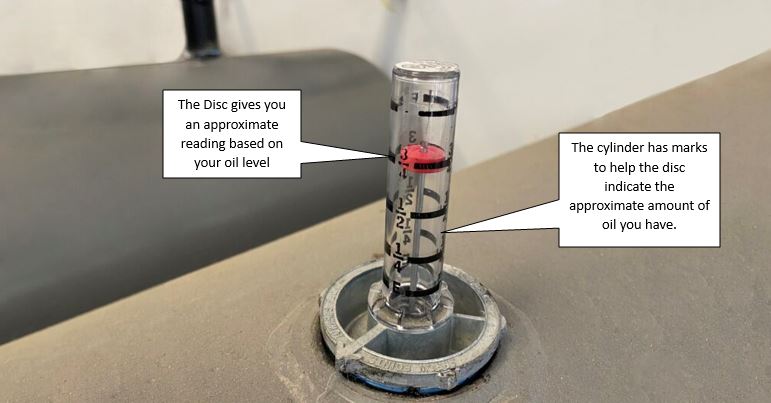
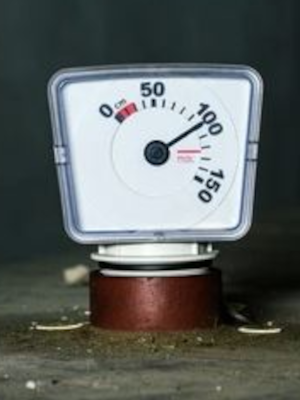
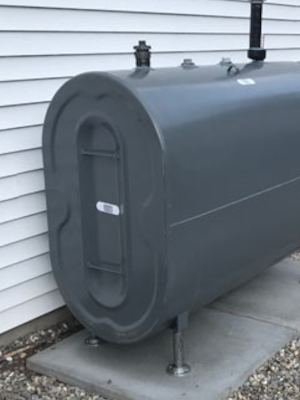
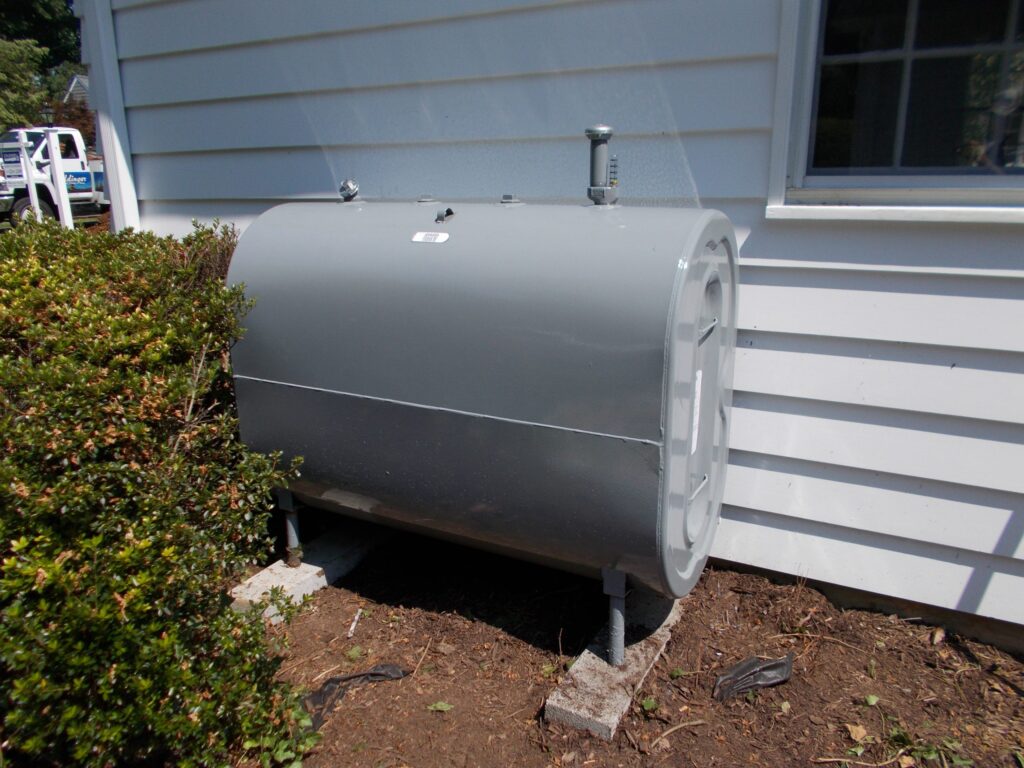
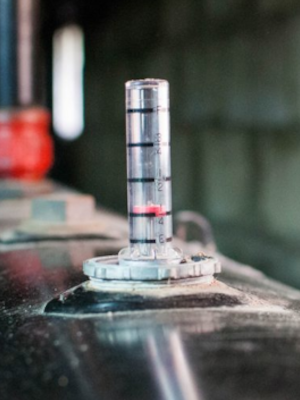
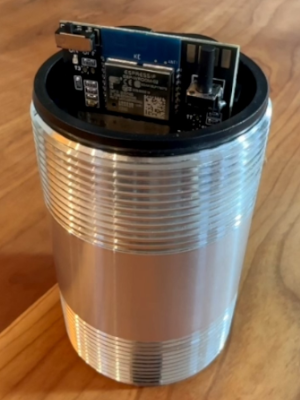
After having your information ready, you’ll be prompted to select a Sensor. One being the Smart Oil Gauge Duo and the other being the Standard Smart Oil Gauge. The process is the same on both devices, but they look slightly different which makes selecting the correct gauge important for an easy and smooth configuration process!

Entering Configuration Mode

After selecting your sensor, the app will prompt you to turn off the device. This will help you come to ensure that you are starting from scratch and make sure that you are following the steps in the app correctly! After you turn the gauge off and follow the video displayed on the app, the next step requested is to turn the gauge on. After doing this, you’ll be prompted with an option asking if the light flashed or not. The LED light flashing indicates that the gauge is on and receiving power.

If the light on the gauge flashes, then you’ll have to select “Yes, the Light Flashed” and it will take you to another screen where it will prompt you to type in the password for the network that your phone is connected to. Now, if you want the gauge connected to a different WIFI network, you can select “Choose a Different WIFI Network”.

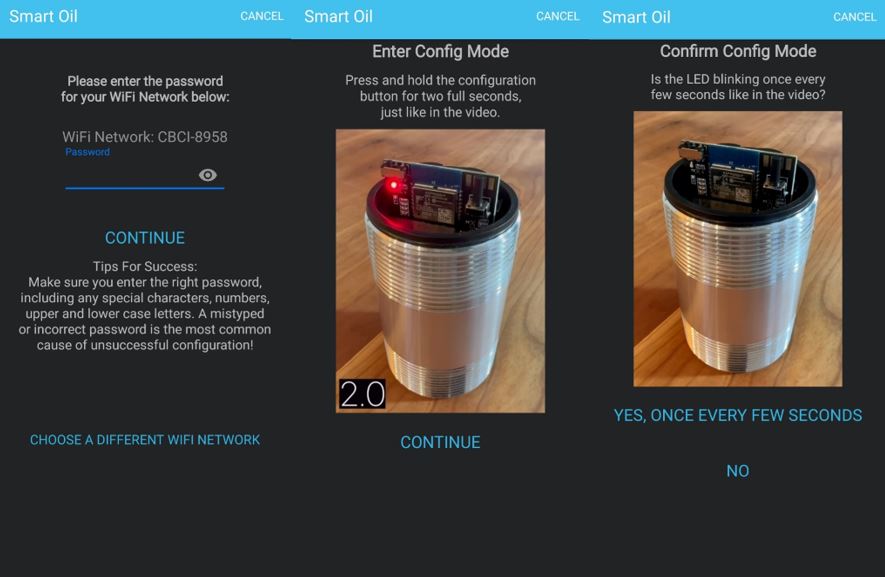
After typing in your password or selecting the Different network option, the app will now instruct you to get the gauge into the config mode. Getting the gauge into the configuration mode is very simple. Simply push and hold the button on the gauge down, once for two seconds (one-one thousand, two-one thousand). This will cause the gauge to start blinking once per second. The app will show you a video of how the light should be flashing on your gauge. There will be another prompt that will ask you if the light on the gauge is blinking once per second. If it is blinking, select “Yes, once every few seconds”. Otherwise, select “No” and the app will guide you through various ways to troubleshoot.

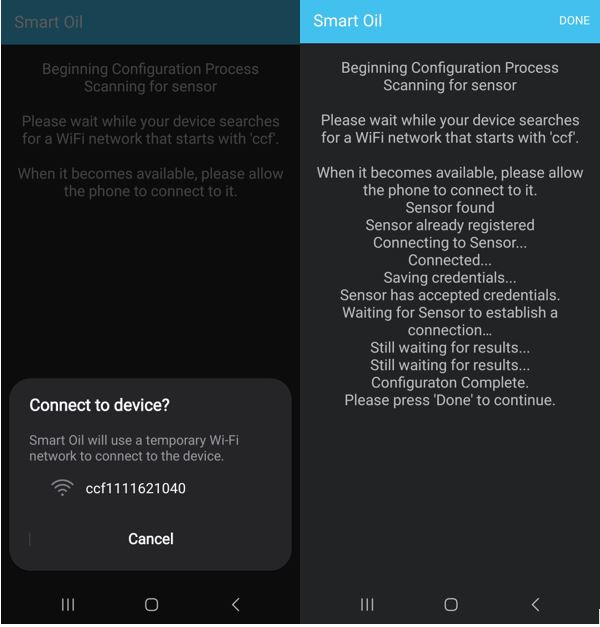
Connecting the Gauge to Your WIFI

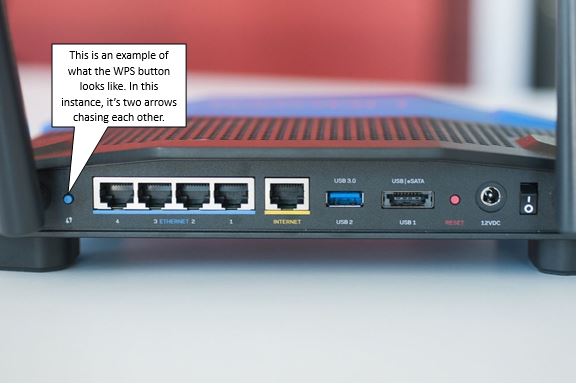
After you select “Yes, once every few seconds”, you will get a prompt and menu show up that says “Beginning Configuration Process” and the device will begin attempting to connect the gauge to the WIFI. You will see an option pop up that shows a network that says “CCF######”. That is the gauge’s network that it will need to connect to for the device to make a stable connection to your router.

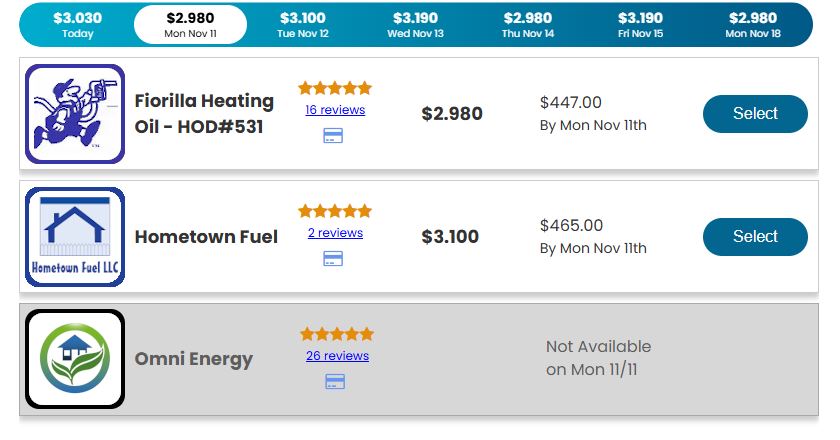
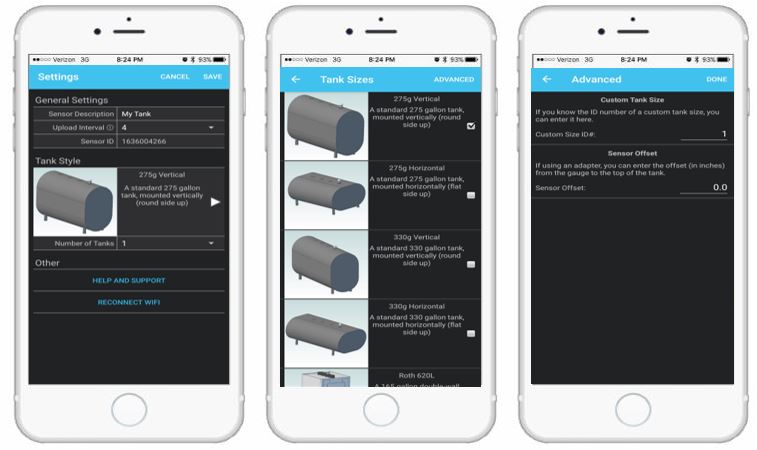
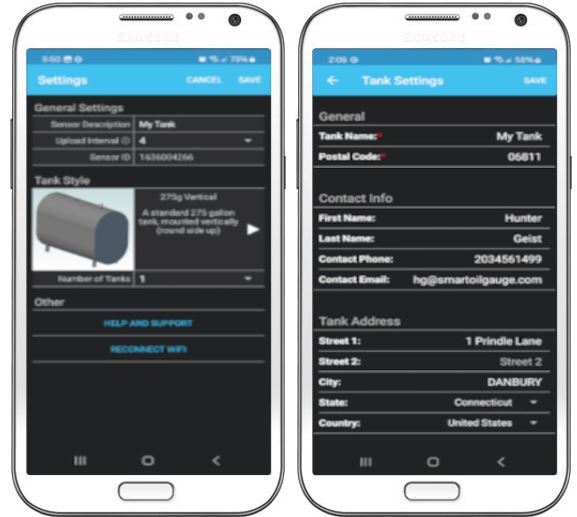
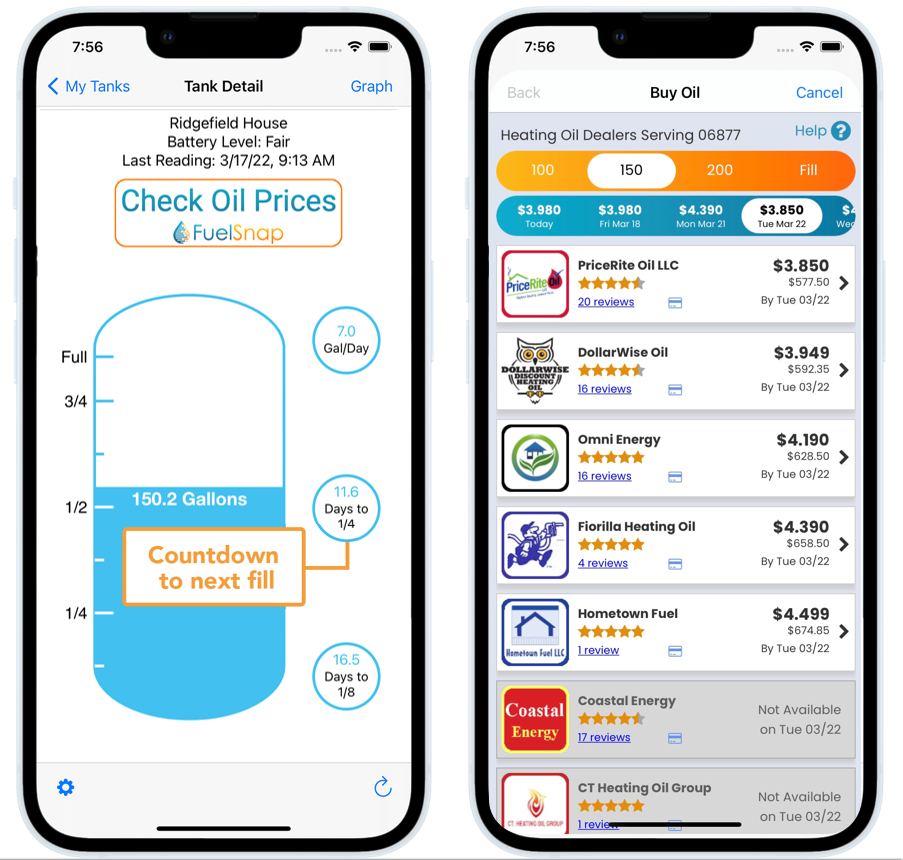
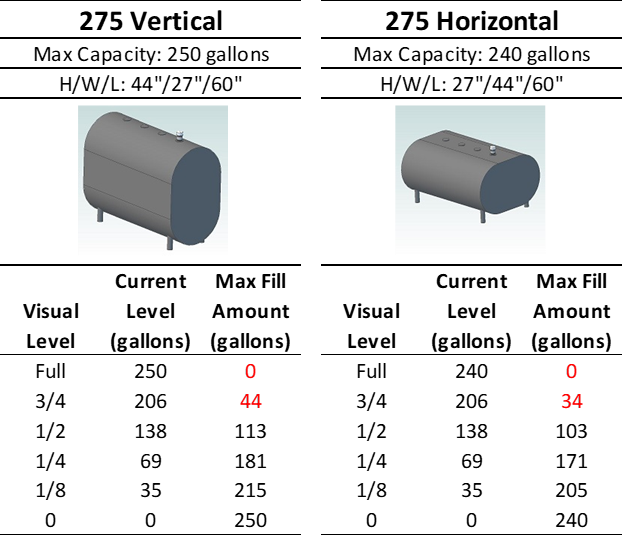
After completing the configuration process, the app will present you with a set of options to finish setting up the gauge to your account. This includes address, tank size, upload interval and alerts. You’ll need to be sure that you fill out this information. Filling out the address is optional, as it’s mostly used for ordering oil through the Smart Oil Gauge app. However, if you don’t want to order oil through the app you don’t have to! It’s completley optional!

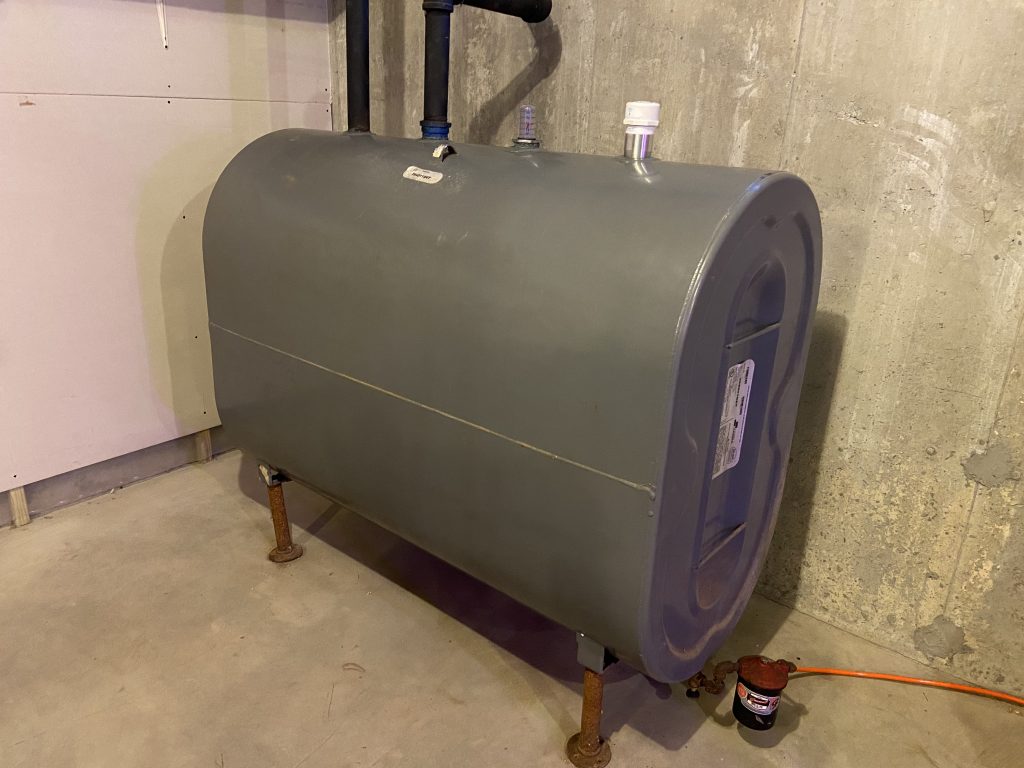
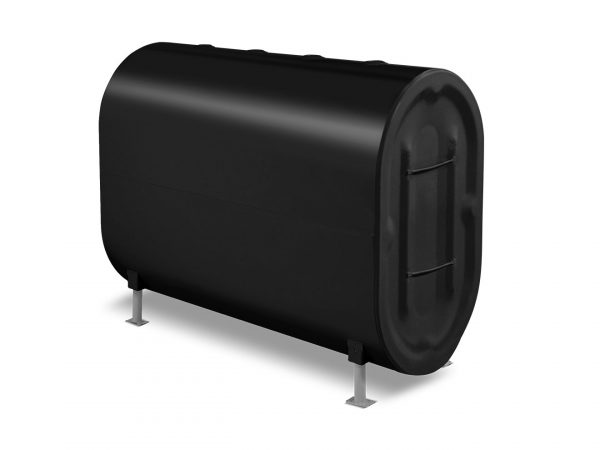
Once you’ve filled out the rest of the configuration information, you’ll be all set to go and install the gauge onto the tank! If you are unsure how to install the gauge, you can follow our instructions here. You can also watch our detailed installation videos on YouTube! We have installation processes for both Roth and Granby style tanks!

Conclusion

The new and improved Smart Oil Gauge config mode will be incredibly helpful for getting your device online and setup! While this process helps streamline the initial setup process, it helps with reconnecting the gauge to the WIFI if you have a change to your home network!

However, even though this new process is much simpler to do, we’re still happy to help if you’re confused! If you need help setting the gauge, you can give our support line a call! We can be reached at 203-456-1499 option 3 from 8am-5pm EST, Monday through Friday.

I hope you enjoy your Smart Oil Gauge!

Happy Heating,

Hunter

Reconnecting the Boards in your Smart Oil Gauge

Both new and existing Smart Oil Gauge users might know that the original Smart Oil Gauge has two boards in the interior. One controls the sensor on the bottom and the other communicates with the battery box and the inner computer. However, sometimes when you swap out the batteries in the gauge or during the config process, these boards will get disconnected. The result of these boards disconnecting is the gauge reading full. What the exact reading will be depends on the maximum capacity of your tank in particular. In this article, I’ll be explaining how this happens and the process of reconnecting the boards!

How Does this Happen?

This typically will happen during either troubleshooting or when you change out the battery in your device. Often when this happens, the battery box of the gauge is pulled out too hard and the battery box pulls the board out of the connection with the pins.

Sometimes this can also happen after the initial configuration. However, this is more likley to happen after you put it on the tank and try to troubleshoot it if it doesn’t come back online. This will only happen though if you remove the top board from the interiors of the gauge. DO NOT remove the top board from the interiors of the gauge, unless specifically told to by our support team. This won’t damage the gauge, but it can be quite frustrating to get the gauge to reconnect and to reconnect the boards.

What does It Look Like on the App?

When you load up the Smart Oil Gauge app with the boards disconnected, you will get a reading that says “Full”. But sometimes this can show up as greater than what your gauge normally reads. For example, on a gauge that is reading for a 275 gallon tank, might get a reading of “Greater than 235 Gallons”. This is partially due to the standard Smart Oil Gauge’s Sensitivity. The Smart Oil Gauge will not be able to see anything above the 8″ mark of the tank. This is because the signal will bounce around a lot at the top of the tank which will cause the gauge to read less. So, your gauge will not be able to read more than what is at the 8″ mark on your tank. Depending on your tank size, this can vary.

This is what you’ll tend to see on your graph when the boards are disconnected. On this 275 gallon tank, the reading surpasses the maximum capacity of the tank.

A good indicator of when the boards are disconnected is by looking at the graph reading. The reading on the graph on the app will show that the tank is also “Full”. Sometimes it’s harder to see on the app’s graph display. You can always check the Smart Oil Gauge’s website and login there! You can view your graph and data there which you’ll be able to see that maximum reading a little better there.

This is often what you’ll see on the website if the boards are connected. Please note that you should NEVER see a reading of 276.3 gallons on your Smart Oil Gauge. That is beyond the tanks capacity. If you are seeing this type of reading, please contact our support!

Reconnecting the Boards

Going through the process of reconnecting the boards is very simple. You will need to reconnect the boards together. To get a better idea of what you’re doing, you’ll first want to take the board and battery box out of the gauge. Once you have the board in your hands you’ll want to locate the bottom where you will see a little black rectangle with four holes. That rectangle is where the pins connect to the boards. You’ll want to slightly push that black box back to make sure it’s as close to the back of the board as possible. Then, make sure you slide the four pins into the pin ports of the black rectangle. The two boards should click together and reconnect!

This is typically what the process for reconnecting the boards should look like.

As shown in the above pictures, the reconnection process for the boards is relatively simple. You want to make sure that the pins on the bottom board line up with the pin port on the top board. This should allow the boards to connect and return to normal readings! However, it’s important to know that the boards can be a little sensitive. This means that even if one pin doesn’t connect properly, the gauge will still only display a “Full” reading. So it’s important for you to make sure that all the pins connect to the pin port properly.

This is an example of what an offset board will look like on your gauge. An offset pin will still cause the gauge to read “Full”.

Does this Happen on the Duo?

The boards disconnecting on the Duo is very rare. That’s because the boards for the gauge and sensor connect on the inside of the trash-can like structure that comes with the Duo. The boards and gauge are connected very well and the boards will often not disconnect with each other.

However, sometimes you’ll get a full reading on your Smart Oil Gauge Duo. This is often caused by moisture or oil on the sensor. You can usually resolve this by using a dry cloth such as a paper towel or wash cloth to clean off the sensor. That will normally clean off anything on the sensor that is causing it to read full.

If wiping the sensor of the gauge off doesn’t work, contact our support and we’ll be happy to try troubleshooting with you over the phone! But make sure you have your gauge’s order number handy! This is so that we can determine if your Duo is still under warranty incase we need to replace the device!

Conclusion

If you have a Standard Smart Oil Gauge, reconnecting the boards is something that you will have to do at some point. Especially if you recently changed out the batteries or the gauge was offline for a brief period of time. You should be able to reconnect the board using this blog as a guide!

As always, if you have any other questions or concerns, please do not hesitate to reach out to our support team! We are available from 8am-5pm EST, Monday through Friday at 203-456-1499 option 3. If you do not reach someone over the phone, please leave a voicemail and we’ll get back to you at our earliest convenience!

Happy Heating,

Hunter

Managing Heating Oil During the Holiday Season

With Christmas and New Year’s around the corner, December can be an expensive month, especially during peak heating oil season. Oftentimes during the holiday season, you have to buy Christmas Gifts, prepare for the annual family gathering, and get ready for your upcoming New Year’s parties. With the added stress and fear of running out of heating oil, it can be a lot for one person. So in this article, I’ll be giving you some tips and tricks on managing your heating oil so you don’t have to worry about running own during the busiest time of the year!

Come Up with a Financial Plan

Coming up with a budget for the month of December is the most important thing that you should do. By having a plan in mind that helps you understand where you’re spending your money will help you put some aside for heating oil. At the time of writing, heating oil prices are sitting around $2.99-$3.25 per gallon. Depending on how much your tank’s capacity is, this could cost you anywhere from several hundred dollars, to close to several thousand! However, if you’re a homeowner with a standard 275 or 330 gallon oil tank, then you shouldn’t have to spend more than a couple hundred.

Heating Oil Prices can be very erratic. So it’s important to stay on top of prices, like in the above example!

It’s important that when you come up with a financial plan, that way you set money aside for heating oil. This will ensure that if your tank runs out if oil, you have the money to order some, rather than having your tank suddenly run empty and not have the money to order more oil. Having money set aside for heating oil will also help you ensure that you have enough for your other expenses in December.

Signing Up For Automatic Delivery

I should start off by saying that, I don’t typically recommend signing up for automatic delivery. However, if you’re the type of person who doesn’t like to think about when you need heating oil and when you’re going to run out, then automatic delivery is for you!

But there are some important things to note about automatic delivery. The most important note is the price. Automatic delivery tends to be a bit more expensive in the long term. But if money isn’t something you tend to worry about or if you like paying an additional charge for that peace of mind, then this is for you! You’ll no longer have to worry about when you need to order or when you’re going to run out, because your heating oil provider will handle that for you!

But that being said, you should still make sure that you have a functional tank monitor or gauge to ensure that you don’t run out and so that you can order oil in the event of an emergency. A float gauge or Smart Oil Gauge, would suffice.

Start Saving Ahead of Time

I might be a little late on this one, but planning your holiday spending several months in advance. This will not only be beneficial to help you save money on oil costs, but it can also be helpful for your other holiday expenses. By saving money in advance, you’re saving yourself the stress of wondering if you can afford ordering oil when you run out or even on your other December expenses.

Setting aside some money before heating oil season starts is a great way to prepare for when the prices get high as demand gets higher. Ensuring that you save this extra money is important to prepare for when prices increase due to high demand and to ensure you’re able to pay that amount in an emergency! This will also help you ensure that you have enough money to cover your holiday expenses as well!

Install a Smart Oil Gauge

One of the best ways to know when you need to order is with a Smart Oil Gauge. It not only tracks usage, but it will also tell you how much oil that you have in your tank! This will give you the peace of mind of knowing how much oil is in your tank. But it also allows you to order oil whenever you need it! All of this, in the pal of your hand!

With the Smart Oil Gauge app’s built in ability to allow you to order oil from the app, you’ll never have to worry about running out! With our built in FuelSnap feature, you’ll always be able to order oil at the tip of your fingers! Just make sure that you configure your gauge for the right tank size so that your gauge will be able to accurately tell you how much oil is in your tank!

These are our two gauges! The Smart Oil Gauge Duo and the Standard Smart Oil Gauge! Either will be able to provide you with an accurate reading of how much oil is in your tank!

The gauge can also send emails, texts and push notifications to alert you if you need to order oil, when you get a fill up and much more! Just make sure that you have all that information set up in the app prior to installing it onto the tank so that you can have the peace of mind while the gauge is installed onto the tank!

Conclusion

December is the most expensive month of the year. With both Christmas and New Years around the corner things are getting expensive. So it’s important to be prepare yourself for an increase in spending.

Getting a Smart Oil Gauge will help you monitor your heating oil to ensure that you don’t run out. While a financial plan will prepare you in the event that you’re low or run out. Setting aside money for heating oil prior will help prepare you for when you are getting low. But if you need a last minute Christmas Gift, feel free to order a Smart Oil Gauge!

You must prepare yourself for the busy months of the year. If you follow these guidelines and tips for being prepared, I’m sure that you’ll be able to be on top of your heating oil needs as well as being ready for the holidays!

Happy Heating,

Hunter

The 10 Best Ways to Save on Heating Oil Costs

When it’s winter in the northeast, you’ll notice that heating oil prices will tend to be at their most expensive. You’ll find yourself having to refuel every month or so, to maintain the heat in your house. But there’s always that important question, “How can I save money on heating oil?”. If you find yourself asking that question, then keep reading! I’ll be covering the best ways to save money on heating oil costs in this article.

These are what you’re typical heating oil truck will look like. You can find them all over the northeast during heating oil season. But during the spring and summer, they are much less common.
  1. Cancel your Automatic Delivery: Canceling your Automatic delivery might initially sound strange. However, automatic delivery can actually be a major reason you’re spending so much money on heating oil costs. Dealers will tend to charge more oil per gallon with automatic delivery. On average, dealers will tend to charge at least 50 cents or more per gallon when using automatic delivery. Canceling it might end up saving you several hundred dollars yearly! You might want to try ordering from our FuelSnap website more often! Our website allows you to check which dealers in your area are offering oil and at what cost! This can help you save money by giving you a variety of dealers to choose from.
  2. Check for Drafty Doors and Windows: Being sure to cover up your drafty windows and doors will help you reduce the amount of oil that your boiler is burning overall. By covering them up, you’ll naturally burn less oil! This is because your boiler won’t have to output as much heat. After all, there is no draft that is causing the heat to leave the house.
  3. Order Oil During the Summertime: While it might seem counterproductive, this is a great way to get heating oil at a low price! During the summer, the demand for heating oil is very low. So prices will naturally be lower. Ordering during the summer will ensure you get heating oil at a lower price than if you would order during the fall or winter. Plus, if you don’t use your heating oil for hot water, then you’ll just be stocking up on heating oil for future use!
  4. Don’t Order Heating Oil During the Holiday Season: Around Christmas and New Year’s, oil prices will spike up. Like how gifts will spike in price around this time. This is the exact opposite of how prices get in the summer. The holidays is when heating oil is in the most demand. So unless you are completely out of oil, we don’t recommend ordering oil around this time at all.
  5. Increase your Home’s Insulation: Increasing your home’s insulation is a fantastic way to reduce heating oil consumption. Whether you are adding in more insulation or improving it, you’ll naturally decrease your consumption. This will let your home retain more heat for longer. When doing this, you should see a decline in usage that will immensely benefit you in the long run,
  6. Investing in a WIFI Thermostat: These WIFI thermostats are very useful and are a great way to conserve heating oil. They will benefit you in the long run by allowing you to control your home’s temperature from the tip of your finger. Most of these thermostats have an app where everything is controlled. You’ll be able to lower the heat or raise it depending on if you’re home or not. This will also help reduce your heating oil usage when you’re not home! Doing this will allow you to monitor and adjust the temperature in your home remotely from anywhere!
  7. Upgrading your Heating System: Your heating oil system will become less efficient over time. For this reason, in particular, you will need to upgrade your heating oil system. By doing so, you’ll improve your system’s overall efficiency and you will see a stable decrease in your oil usage due to a more efficient system.
  8. Turn Down/Off Your Thermostat when you aren’t home: Even if you don’t have a WIFI thermostat installed in your home, turning down the thermostat when you’re not home will keep your temperatures down, which will keep you from burning a lot of oil. However, if you have pets, then this rule might not apply to you. Keeping them warm is important too! But, if you don’t have pets, then lowering the thermostat is a great way to conserve your heating oil!
  9. Turn Off Heat in Empty/Unoccupied Rooms: When you turn off the heat in rooms that are empty or not being used, this will greatly decrease your oil consumption. Close any vents or radiators that are in rooms that do not have frequent or adequate usage. This will reduce the overall amount of oil that the burner has to burn to heat your home.
  10. Purchase and Install a Smart Oil Gauge: The Smart Oil Gauge is a very useful and dependable product. It will be able to track your heating oil usage and can keep you in the loop about your level. It will alert you when the tank is running low and when you’re burning too much oil! Overall, this will help you stay on top of your heating oil. The best part is that it is all through your phone! Simply download the Smart Oil Gauge app and you’ll be able to keep track of everything you need to know at the touch of a button!

Conclusion

By following these ten ways to save money when ordering heating oil, you’ll find that you’ll be able to save both on your costs and your consumption! Following these will not only help you with burning less oil, but you’ll also be able to ensure that you will use different ways to conserve and burn heating oil in the future!

Happy Heating,

Hunter

What to do When You Run Out of Heating Oil

If you’re reading this, then you might find yourself in the unfortunate situation of having run out of oil. But don’t worry, this happens to everyone at least once. There are steps that you can take to resolve this and ensure that it doesn’t happen again. In this article, we go over various steps to ensure that you’ll be ready for when you need to order heating oil and get your system back up and running!

In this article, I’ll be covering each of the following:

  1. Making sure that you’re actually out of oil.
  2. Scheduling an oil delivery! If you’ve run out of oil, this is very important to do!
  3. Putting 5-10 gallons of diesel in your tank. This will hold you over until your delivery arrives.
  4. Restart your burner by pressing the reset button.

Check to Make Sure that You’re Definitely out of Heating Oil

Running out of oil isn’t the only failure that your home’s heating oil system can have. This means that running out of fuel isn’t always the problem. A couple of winters ago, I thought I had run out of oil, but my float gauge said I had half a tank. Turns out, it was a faulty starter! So be sure to be mindful that you might’ve not run out of oil!

Most heating oil tanks are equipped with some kind of float gauge. This type of gauge in particular will measure the level of your oil tank using a bobber. This will give you an estimation of how many gallons of oil are in your tank. Inside the gauge’s translucent cylinder, you will see a colorful disc. Gently pressing on the disc will help you get an idea of if it’s accurate or not. If you press down on it, it should slowly return to normal if there is oil in the tank. But if it doesn’t, then you are most likley out of oil. If there is oil in your tank, then you can skip “Restarting Your Burner”

This is what your average float gauge will often look like. As you can see in the above photo, there is a disc inside the cylinder. The cylinder has markings that will determine approximately how many gallons of oil are in the tank.

Scheduling an Oil Delivery

After you’ve made sure that you are out of oil, you must place an order for oil as soon as you can! Using our FuelSnap website, you can access prices and dealers locally. This will give you the ability to shop around and get the cheapest prices available to you! By typing in your zip code you’ll get access local dealers in your area. You also won’t have to worry about additional charges in the case of an emergency! So feel free to order using the website whenever you are low! It’ll save you in a pinch!

If you are using the Smart Oil Gauge app, you might notice that on your “Tank Detail” screen, you see an option that says “Check Oil Prices”. This will let you order from FuelSnap through the Smart Oil Gauge app! After the press of a few buttons, you can have a delivery of oil placed and ready to go!

Once you’ve placed an order using FuelSnap, you’ll get a confirmation email for your order. This email will contain useful information such as the dealer’s name, number, and email. You’ll be able to contact them with any issues or questions regarding your order! If you need an exact time, you can contact the dealer and they will let you know when the dealer’s ETA is!

Add Some Diesel

When your tank is out of oil, it’s not good to leave it empty. After you place your order, immediately head over to your local gas station and pick up about 5-10 gallons of diesel. Depending on the prices for diesel in your area, this might run you about $20-$50. Diesel is very similar to heating oil, so putting some in your oil tank will not damage any of the parts of your system. But, this should only be used as a temporary solution. Diesel needs a special system to be a long-term heating solution.

If you don’t already have one, you should purchase a yellow jug from your gas station to fill it up. This will normally help differentiate between other forms of crude oil. Red is usually for gasoline and blue is for kerosene. The 5-10 gallons you get will help you get through the night and keep you warm during the winter. During the spring and summer, the diesel will last you a couple of days. But, if you want to be on the safe side, getting 10 gallons would be best!

Stopping at your local gas station will help you ensure that your heating oil system doesn’t get damaged when you’ve run out! It’ll also hold you over until you get your delivery!

Restarting Your Burner

The final step is to check your oil burner. The reason for this is that the issue might not be that you’ve run out of oil, but it could be related to the burner! If you have oil in your tank and you wake up to a cold house, there is likely an issue with your heating system. This could be anything from a faulty starter or a clogged feedline. For any issues regarding your heating oil system, it would be best to contact an HVAC technician to handle these particular issues.

If you put some diesel into your heating oil tank, then you should restart your burner ASAP. This is because with your furnace being deprived of oil for so long, it will need a reset for it to get back up and running. In the below image, you can see where the reset button on your burner is located. It’s usually the button in the center of the starter and will either be flashing a red light or nothing at all. After you’ve pressed the button, give the starter 15 seconds and you should start to hear the system start back up. The system will either continue to stay on, or it will turn right back off.

If your heating oil system doesn’t turn back off, you will likely need to bleed the air off the lines. However, DO NOT attempt this if you are not mechanically proficient. It would be best to contact an HVAC technician to handle this. After the lines have been bled, press the reset button again and see if that gets the system up and running again. If at this point, your system is back up and running, you MUST contact an HVAC technician to inspect your heating oil system.

Being on top of your burner is very important! You must ensure that your system is working correctly so that you can ensure that you house is always heated!

Conclusion

Running out of oil is not enjoyable at all. Waking up in the morning to a cold house will sour your mood for the rest of the day. In best case-scenario, you’ll simply just have to run to the gas station to grab some diesel. Be sure to order some oil using our FuelSnap website! Or if you have the Smart Oil Gauge app, feel free to order oil from there!

But, if your issue lies with the burner, you’ll need to contact an HVAC technician. Your burner could’ve sucked up some sludge and clogged from the feedlines, or worse. If this is the situation that you’re facing, you’ll need to contact an HVAC technician.

Overall, the best way to prevent this is to purchase a Smart Oil Gauge! The gauge will be able to give you an accurate reading of your tank’s level as well as your oil usage! This will help understand how much oil you have and are burning! It’s all accessible to you at the touch of a button! You can even receive push notifications and email alerts when your tank’s low and when you get a fill! Best of all, you can even order oil right from the app! With the Smart Oil Gauge, you’ll never have to worry about running out of oil again!

Happy Heating,

Hunter

How Long Until You Run Out of Heating Oil

With the outside temperatures starting to get cold again, heating oil is on the mind. So it’s important to be mindful and check your heating oil tanks. But also, it’s important to check the price of heating oil. When oil prices get high enough, you might up spending close to or over $1,000. It’s important that because of this, you ask yourself “How long until I run out of oil? Well don’t worry, I’ll be covering that in this article here.

We’ve seen heating oil prices as high as $4 a gallon this year! Due to this, you might be tempted to wait until the very last minute. But this isn’t always the best idea. Especially in the winter.

What’s the Capacity of a Heating Oil Tank?

Usually, standard oil tanks will have a capacity of 275 or 330 gallons. However, these tanks will never get filled up to their maximum capacity. So they have a true capacity of 250 or 315 respectively. But that being said, I don’t recommend letting your tank get low. The reasoning for this is because your tank could have some sludge build-up on the bottom of it. This is common on old steel tanks. But, if you have a Roth tank, you won’t have to worry about this. However, that doesn’t mean that you should let your tank get low.

When your tank’s level gets below 1/8 full, you’ll start to stir up the sludge in your tank. The sludge will then get sucked into your burner’s feed lines. This can often cause a clog and worst of all, no heat! This is a huge problem that has to be dealt with immediately.

With this information in mind, you should NEVER let your tank’s oil level get below 1/8 full. For a tank that’s 275 gallons, this is about 35 gallons. DO NOT Let it get below that amount of oil. This can result in your feed lines sucking up sludge and your burner getting shut down.

Due to this 35-gallon mark, you really only have about 215 usable gallons on a 275 gallon tank. But, this is a worst case-scenario. You should always order oil at a quarter tank.

In the above photo, you’ll see an example of a 275-gallon tank. These are the most common style of heating oil tanks. 330 gallon tanks will generally look the same, but will tend to measure around 6ft long.

How Long Will a Tank of Heating Oil Last You?

By knowing the size of your tank, and the amount of usable gallons that you have in your tank, you’ll be able to figure out how long an entire tank of oil will last. The next questions is a little bit trickier to answer. That question is “How much oil will your house need?”. I go very in-depth on this in my articles on usage during Spring and Winter. Take a read at those to get my in-depth explanations on usage during those seasons!

During the winter, you will naturally be burning more oil. This is because the outside weather is much colder than during the spring and summer months. You will burn through a lot of oil especially if it’s your primary source of heating. You might even need to get oil delivered every month or so, depending on how much you’re using! The average home will usually burn around 2 to 7 gallons of heating oil daily during the colder months.

However, during the spring and summer, you’ll be burning significantly less oil. This is because these months tend to be a bit warmer. Which will cause you to burn less oil than you usually do. If heating oil is your primary form of heating, then you will only really burn anywhere form 1-3 gallons a day on heat. During the summer, you’ll probably burn around .5-1 gallon at most.

You can use this chart to get an estimation of how much heating oil in your home that you’ll end up using during the winter time. If your home is not very energy efficient, you might end up using twice or triple the amount of gallons shown here.
While this tends to be accurate for most homes, this can depend on your personal situation, such as size of the home, how well your insulation is and much more.

Avoid Running Out of Oil: Always Order at a Quarter

You should now have a basic idea of how long a tank of heating oil will last you. This should ensure that you are better equipped to avoid a runout.

The general rule of thumb that I like to live by is to reorder oil when your tank reaches a quarter. This will ensure that the delivery truck has plenty of time to get to you before you run out. You can use our FuelSnap website to order oil online. Or even better, you can use the Smart Oil Gauge, to alert you when you’re running low! The gauge will not only alert you when you’re low, but it will also tell you how much oil you have and how much oil you’re burning, right at the touch of your finger!

Being on top of how much oil you’re burning is important! This will help you figure out how long a tank of oil will last you, and how long until you’ll need to order again! I hope this article has been helpful! If you need to reach me, I can be reached at 203-456-1499 option 3 from 8 am-5pm EST, Monday through Friday.

Happy Heating,

Hunter

Configuring the Right Tank Size for your Smart Oil Gauge

The Smart Oil Gauge is a very accurate tank sensor that is able to give you an accurate reading of the amount of oil that’s currently in your tank. However, it’s important that your gauge is configured for the right tank size. Making sure that your gauge is setup for the right tank size is very important. This will determine weather or not your gauge is accurate when it’s installed onto the tank. In this article, I’ll be discussing how to ensure that your gauge is setup for the right tank size so that your readings will be accurate!

Tank Compatibility

The first thing that should be mentioned is tank compatibility. It’s important to know if the Smart Oil Gauge is compatible with your tank or not. Standard Granby and Roth tanks are the most common tanks that the Smart Oil Gauge is installed onto. Granby tanks are normally found in many sizes, but the most common sizes tend to be 275 & 330 gallon tanks. These tanks will normally have a 2″ NPT fitting for the gauge to be installed onto. If it’s not a standard 2″ fitting, you’ll need an adapter. I go into this in a bit more depth in this article here.

Meanwhile, Roth tanks are a bit more specific. The Smart Oil Gauge is compatible with all Roth tanks except 1500L tanks. This is because these tanks have an interior support baffle that will prevent the gauge from reading less than half a tank. Additionally, Roth tanks require an adapter for installation of the gauge. These adapters are very important for the Smart Oil Gauge. Without these adapters, the gauge won’t be able to send the signal properly and the gauge will always read as full. You can purchase the Roth adapter on our website. If you have a Duo, you’ll need the Duo adapter, but if you have a regular Smart Oil Gauge, you’ll need the standard adapter.

These are what the Roth tanks will usually look like. The gauge is compatible with all of these tanks except the 1500L. The adapters we offer for these tanks will usually look like what you see above.

Setting up the Gauge with the Right Tank Size

When you are configuring your Smart Oil Gauge, it’s important to know what tank size your gauge is setup with. Usually upon setup, the process will ask you what tank size your tank is based on various options shown on the app. These will consist of vertical and horizontal options for 275 and 330, Roth 620L and Roth 1000L tank orientations. If one of those is your tank size, then select it and the gauge will be able to read for it!

However if your tank is not listed on the app, then you’ll need to get a custom tank ID. You can contact our support line with your tank’s dimensions and we’ll be happy to program your tank size into our system! Once your tank size is programed, we’ll provide you with your custom tank ID, and the gauge will start to read for your unique tank size! You can reach out support team to get your custom tank ID at 203-456-1499 option 3 or email us at contact@smartoilgauge.com!

Correct Tank Orientation

While this might not seem like it would have a bit impact, it does. Ensuring that your gauge is configured for the right orientation is very important. This can determine weather or not your gauge is reading correctly or not. You’ll want to know if your tank is oriented horizontally or vertically. Vertical tanks are usually round on top, while horizontal tanks are flat on top like a table. This will usually only apply to ovular Granby tanks. But, knowing what your tank’s orientation is can help the gauge read correctly.

330 Vertical and Horizontal Home Heating Oil Tank
This is usually what the tank orientation should look like. The biggest and most important difference is the height. This can determine how accurate the gauge will be for a tank of your size.

In the off chance that your gauge isn’t configured for the right orientation, your gauge will be inaccurate. I have seen instances where clients have had their gauge set to read for a 275 vertical tank, only for their gauge to be a horizontal 275. This can often cause your gauge to read that you have half a tank of oil, but in actuality, you’re about to run out! So, it’s very important to compare your tank with the image provided on the app when setting up the gauge.

Changing the Tank Size in the App

If you already have your gauge setup in the app then you’ll need to change the tank size. To do this, you’ll want to start off in the screen that says “Tank Detail” on the top. Once you’re here, you’ll want to get to the “Tools” screen. This can be little different depending on if you’re using an Android or IOS device. For iPhone users, all you have to do is click on the gear on the bottom left, and it will take you to the “Tools” screen. But for android users, you’ll have to click on the three dots on the top right and select “configure”. This will take you to the “Tools” screen.

After doing this, you will be taken to a screen where you will see various options such as Tank Settings, Alerts and Sensors. Click on your tank under the sensors section and you will be brought to a screen where you will see various options such as Sensor Name, Upload Interval & Tank Style. Select “Tank Style” and it will take you a screen where you can choose between various different sizes. If you don’t see your size there, click on advanced on the top right and input your custom tank ID. This will allow the Smart Oil Gauge to read your tank accurately!

In the above photo, you’ll see what the steps are to change your tank size! If you aren’t using an adapter, you can leave the sensor offset alone. You will also only need to use the custom tank size if your tank size doesn’t appear in the list of tank sizes.

Ensuring that You Have the Right Tank Size

It’s very important to ensure that your gauge is reading for the right tank size and orientation. So be sure to double check what your gauge is set to and what your tanks dimensions are! They can really make a huge difference for the accuracy of the gauge. The last thing you’ll want is to wake up in the morning to a cold house during the winter!

If you’re unsure if the gauge is reading for the correct size, or are simply having trouble configuring the gauge, please let us know! Our support team is always willing to help get the gauge online if you are ever struggling to get the gauge online!

Happy Heating,

Hunter

Using the WPS Method for your Smart Oil Gauge

There are a few methods to use for getting your Smart Oil Gauge setup. One of which is the WPS method. WPS stands for WIFI protected setup and is used to establish a secure connection between the router and whatever device you are pairing. However, not all routers and devices are able to use the WPS method. So in this article, I’ll be covering how to identify if you router has a WPS method and how to configure the gauge using this method.

The WPS Button

The WPS button is a button that is located on your router and is used to get your gauge into the WPS mode. This mode can be used to reconnect an existing device to your network if you’ve changed any of the credentials. It can also be used to connect new devices to your network for the first time. This button is normally located on either the front or back of your router, and it can take many appearances. Most of the time, the button itself will say WPS or it will look like two arrows chasing each other. However, depending on your router and ISP, it could look either like a globe or a lock.

The WPS button is commonly found on the back of the router. Although, sometimes it can be found in the front.

Pressing this button will cause the router to enter the WPS connection mode. This will allow your router to connect to devices in the same WPS mode. However, you’ll have to be quick because the router will only be in this mode for about 2-3 minutes on average. There is a little light on the front of your router that will typically start flashing once it enters this mode. This will notify you that the router is in the WPS connection mode.

But you might be asking, what devices you can connect using the WPS mode. Well, the Smart Oil Gauge is one of them! Similar our other methods, you have to press the button on the top right of the gauge in a specific way. I’ll be touching on that later on in this post. Surprisingly, cell phones and gaming consoles don’t offer a WPS connection. Most cell phones operate off of a simple WIFI connection, while gaming consoles can use either WIFI or ethernet connections. The most common devices that include WPS are smart TVs, blue-ray disk readers, security cameras and printers.

Setting Up The Gauge With the WPS Method

To setup the gauge using the WPS method, you will first need to bring the gauge over to your router. This will make the process a bit easier in getting the gauge setup. Like all setup methods, we recommend that you setup the gauge before you install it on the tank This will make the process of getting the gauge setup and configured much easier in the long run.

Once you have the gauge by the router, locate the WPS button and press it. You should see your router start to light up and flash. Once it’s starting to do this, you’ll need to press and hold on the gauge’s config button once for three seconds (count one-one thousand, two-one thousand, three-one thousand). This will cause the gauge to start flashing three times per second. Once the gauge is in this config mode, you don’t have to do anything! Just keep an eye on the blinking light and see when it stops flashing.

When the light on the gauge stops flashing, open up your smart oil gauge app and refresh the page. This will require you place your finger on the middle of the screen and swipe down (on IOS devices). For Android devices, there is a refresh button on the top right. Pressing this will refresh the page. But make sure that you are on the same network that you are trying to connect the gauge to so that the app can pick up the gauge on your router.

What to do After the Gauge Shows up on the App?

After the gauge has showed up on the app, you’ll want to select it from the “My Tanks” screen. You will then be brought to the tank detail screen where you’ll now need to get to the tools screen to input your tank’s information. You can access the “tools” screen from the “Tank Detail” screen. On the bottom left on IOS devices, you see a little gear, click that and it will take you to the “Tools” screen. But if you are on android, click the three dots on the top right and select configure to make it to this screen.

After making it to the tools screen, you’ll want to click “Tank Settings” on the top. This section will ask you for your address, zip code and other details. While the address is optional, the Tank name and Zip Code are required. Filling out the address will allow you to order oil from FuelSnap directly from the app. However, this feature is optional! So if you wish to stick with your existing dealer, then feel free to do so!

These are what the “Sensors” and “Tank Settings” screens that you will see in the app. They will allow you to fill out any information that you would need to fill out to order oil on the app.

In the “Sensors” section, this will allow you to change the upload interval and tank style that the gauge is reading for. It is VERY important to have to correct tank size for your Smart Oil Gauge. Without the gauge reading for the correct tank size, it will not read your tank accurately. If your tank size is not listed on the app, then simply reach out to us via email or telephone and we will be happy to configure the gauge for the correct tank size.

What To Do if None of these Work Out

If you’re unable to get the gauge connected and setup using the WPS method, feel free to reach out to us with the gauge’s serial number! The serial number is located on the inside of the cap and is the long all-numerical number. With the serial number, we will be able to find out if the gauge was ever able to connect to the internet or not!

You can reach our support team at 203-456-1499 option 3 from 8am-5pm EST, Monday through Friday. If you can’t reach us by phone call, shoot us an email! You can send us an email at contact@smartoilgauge.com!

Happy Heating,

Hunter

Using a Smart Oil Gauge on an Outdoor Tank

The Smart Oil Gauge is a useful tool that can tell you how much oil is in your tank, how much you’re burning, and much more! You can install it on both indoor and outdoor tanks. However, using it on an outdoor tank is a little bit different than using it on an indoor tank in your basement. There is a little bit more to know and be aware of when using the gauge on an outdoor heating oil tank. I’ll be covering what you need to know in this article!

The Outdoor Model

The most important thing to know is that there is an outdoor model for the Smart Oil Gauge. This outdoor model is what we recommend you use when installing the Smart Oil Gauge on an outdoor heating oil tank. What is the difference between the indoor and outdoor models you might be asking? Well, the biggest difference to be aware of is that it’s designed with a special sealant on the sensor that makes it less susceptible to the elements. If you have an outdoor tank and wish to use the Smart Oil Gauge, you must buy the outdoor model. You can purchase it by using this link here.

This is an example of an outdoor heating oil tank. It looks to be of a standard 275-gallon size. However, you will tend to see various styles of tanks outdoors. Roth tanks are usually pretty common as well.

Installation On Outdoor Tanks

When installing the Smart Oil Gauge on your outdoor heating oil tank, it’s important to know that there isn’t much of a difference between installing it on an outdoor tank compared to an indoor one. Before the Duo was released, we used to have a standard outdoor model. However, since the outdoor Duo provides a much better seal than the outdoor standard did, we’ve discontinued the standard outdoor model. So there is no need to apply Teflon tape to the top threads of the Duo Model!

Additionally, it is important to note that the Smart Oil Gauge is NOT compatible with underground oil tanks. This is because the gauge’s signal gets sent out in a cone shape. So if you were to go ahead and install it on either the fill or vent pipe of the tank, it would not read down in the tank. It would bounce off the sides of the piping and always come back as full.

If your tank is an in-ground tank, you will likely see these pipes sticking up out of the ground. These are the vent and fill pipes. If you were to install the Smart Oil Gauge on one of these tanks, you would likely not be able to read the tank level.

Condensation on the Sensor

Condensation on the sensor itself is common on outdoor tanks. This is because as the sun hits the tank, the oil will produce vapors that will get stuck on the sensor producing moisture and condensation. This can cause the gauge to read all sorts of strange readings. These can range anywhere from full, to empty to fluctuating between the two. Despite these readings being all over the place, this is very easy to fix. All you have to do is take the gauge off the tank and wipe the sensor clean with a dry cloth like a paper towel or washcloth. Doing so will clean off any moisture or condensation on the sensor itself. This will help to ensure your gauge is reading accurately.

To prevent this from happening often, it’s wise to take the gauge off the tank and wipe the sensor clean with a dry cloth every month or so. This can help prevent moisture from building up on the sensor and help clear off any moisture that’s already growing so that the gauge can read accurately. Making sure that the gauge itself is cleared of any moisture or condensation will be able to better benefit the Smart Oil Gauge in it’s ability to read accurately.

The Readings on an Outdoor Heating Oil Tank

While this might come as a shock to some, the readings on outdoor tanks can sometimes be a little odd. This is mostly due to the frequent temperature changes outside and how to sun hits the tank. As it tends to get warmer out, the oil in the tank will expand as it is warmed up from the outside temperature. The same applies to when the sun hits the tanks. This will cause the oil level in the tank to expand. Upon doing so, the gauge will read a bit of oil in the tank then it will slowly go down and back up again. Kind of giving the readings a “wavy” effect. This will cause the readings to rise and dip. If you see this, there is no cause for alarm. This is completely normal.

This is an example of what the readings on an outdoor tank will look like! As you can see there is a little bit of a wave to it. You’ll see this happen as the oil in the tank expands and retracts due to the temperature.

If the outside temperature gets below 10-15 degrees Fahrenheit, the gauge will get some spikes in the level reading. This can cause the gauge to read full when it isn’t. This is only really a problem in states where there is often extreme cold, like Alaska. Sometimes in the northeast when a cold front rolls through you’ll see these types of readings Although it tends to be pretty uncommon here.

Conclusion

The Smart Oil Gauge is a fantastic device to use on an outdoor heating oil tank! Like on an indoor heating oil tank, it will calculate your level and usage based on its ultra-sonic sensor. With the app installed on your phone, you’ll be able to get a reading anywhere!

Different variables will need to be kept in mind while using it on an outdoor tank, but that shouldn’t stop you from enjoying everything that it has to offer! After using it for a while, you’ll be thankful that you did!

Happy Heating,

Hunter

How Much Heating Oil Does My Tank Have?

When’s time to order heating oil, it’s very important to know how many gallons can fit in your tank. This will allow you to maximize the size of your delivery and take advantage of any discounted pricing that the dealer is currently offering. Some dealers will charge more for less oil you order, so it’s important to know how much is in your tank so that doesn’t happen! If you want to get more information on how to order oil online using FuelSnap, check this article here!

But before you go ahead and order oil, you’ll need to make sure that your tank has enough room for at least 100 gallons of heating oil. For most dealers, they will only deliver a minimum of 100 gallons. Some dealers will deliver less than 100 gallons, but at a MUCH higher price than what it would be at 100 gallons. Additionally, if you order 100 gallons and your tank cannot take the full amount, then you might get an upcharge for not taking the full 100 gallons! This is why it’s so important to know how much oil is in your tank at all times! Not only to prevent running out but to make sure that your tank can fit the amount of oil that you’re ordering. To calculate this, you’ll need to ask yourself the following questions:

  • What is your Heating Oil Tank’s Style?
  • What’s the maximum capacity of your tank?
  • What is the current level of oil in your tank?

You can actually calculate how much oil by subtracting the maximum tank capacity from your current level. It should look something like this:

Current Tank Level – Maximum Tank Capacity = Maximum Delivery Amount

What’s Your Tank Style?

Nowadays, there are a lot of different tank styles to worry about. There are standard steel heating oil tanks by Granby and double-wall steel tanks by Roth. So it can get pretty confusing on what style of tank you might have. But don’t worry, it’s pretty easy to differentiate between the two. So you shouldn’t have to worry about getting them confused.

Traditional Granby Steel Heating Oil Tank
This is a standard Granby steel tank

Granby Steel Tanks

Granby steel heating oil tanks are the most common heating oil tank, especially in the United States. They are most often found in sizes of 275 and 330 gallons. They can either have an orientation like the one shown in the above photo or lay flat on its side.

A good way to find out if your tank is a 275 or 330 is by the length of the tank. 275-gallon tanks will tend to be 5′ long while a 330-gallon tank will usually measure 6′ in length. Otherwise, both these tanks are identical. You can view all of the different styles for this tank on Granby’s website here.

These are the various sizes for a Roth double-walled tank

Roth Double-Walled Tanks

If you have a new home, live near the ocean, or have recently had your tank replaced in the past couple of years, then you might’ve had this style tank installed into your home. These tanks are called double-walled tanks for a reason. These tanks have an interior plastic tank and a steel-walled exterior tank. The interior plastic tank stores the heating oil and the steel exterior will catch any oil if the interior tank were to fail.

The most common size of tank you’ll see for this is the 1000L which is a 275-gallon tank with a capacity of 250 gallons. There are smaller and bigger sizes available that will hold more or less oil. But if you’re a Smart Oil Gauge user, it’s important to know that the gauge is not compatible with the Roth 1500L. This is because this tank has an internal support baffle that the sensor won’t be able to read past. This will cause the gauge to not read less than half a tank.

Oil Tank Capacity

While your tank might have a maximum capacity of maybe 275 or 330 for example, the tank will never be filled up to the max. This is because not filling it to maximum capacity will prevent the tank from leaking and overflowing. When filling the tank, oil dealers will keep filling the tank until they hear the vent alarm stop.

The vent alarm is normally around 6″ tall and will hang down in the tank positioned under the vent pipe. As oil is slowly filled into the tank, air is then pushed out of the tank through the vented pipe. This will cause the vent alarm to start making a whistling sound. The driver will be able to hear this whistle as he’s pumping oil into the tank. Once the oil reaches the vent alarm, the whistling sound will stop. When this happens, the driver will know when to stop pumping. Depending on your tank size, there will be roughly 5″-6″ of air left in the tank. This is how dealers will rely on filling your heating oil tank. This will also give the dealer a few seconds to turn off the valve to allow them to stop pumping oil into the tank.

These are some examples of various styles to vent alarms. Though they might look different, the concept and how then function is relatively the same!

Now you might be wondering, “What’s my true capacity if it’s not the maximum tank capacity?”. Well, that tends to depend on your tank size. For example, a 275-gallon tank will have a true capacity of around 250 gallons. Meanwhile, a 330-gallon tank will have a true capacity of 300 gallons. You can calculate this by using our heating oil tank calculator! Our tank calculator will automatically determine what your true capacity is once you’ve put in the tank’s dimensions. You will then know what your tank’s true capacity is!

Current Tank Level

Now that you’re aware of what your tank’s maximum capacity is, you’ll need to determine the current level. The easiest way to figure out your current tank level is to purchase a Smart Oil Gauge. It will not only tell you your current tank level, but it will also send you alerts when it’s time to order heating oil! You can also order oil from the app whenever you need it!

But, if you don’t have a Smart Oil Gauge, we can use the float gauge for reference. The float will give you an estimated reading of around 1/4, 1/2, 3/4, and full. But, if you don’t have a gauge or your tank is underground, you’ll have to refer to a tank chart. This will require you to stick measure the tank and use a heating oil tank chart. Make sure that you are looking at the correct tank size or have the chart that your tank provider provided you with.

This is an example of a float gauge that’s at 3/4 full. This will give you a rough estimate to how much oil is in your tank!

Over time your float gauge will become less accurate and can break. As the years go on, oil and sludge can coat and cover the bobber which can cause issues with accurate readings. If this is the case, or your float gauge breaks, upgrading to a Smart Oil Gauge can be a saving grace.

With the implementation of our Smart Oil Gauge Duo, you’re now able to get a precise reading from 0″-72″ inches! That’s a 6′ operating range that covers the top to bottom for most heating oil tanks! The gauge also has no moving parts! So you don’t have to worry about the device getting caught on the side of the tank or covered in sludge! You’re also able to order oil from local dealers in your area at the touch of a button! You can read up on all the benefits of the Smart Oil Gauge by taking a look at this article here!

By using the Smart Oil Gauge, you’re able to get an accurate level of oil in the tank and order oil at the tip of your fingers!

Conclusion

Keeping all of this information in mind, you should now be able to fully understand how much oil is in your tank! Whether you use a Smart Oil Gauge or the old float gauge is completely up to you! Just be sure to keep an eye on your oil level and track your deliveries, usage, and level and you’ll be able to ensure that you don’t run out again!

Happy Heating,

Hunter

275 Vertical and Horizontal Fuel Oil Tank
330 Vertical and Horizontal Home Heating Oil Tank
Roth 1000L and 1000LH Heating Fuel Tank
Roth 620L and 1500L Heating Fuel Tank