The Smart Oil Gauge is a very accurate tank sensor that is able to give you an accurate reading of the amount of oil that’s currently in your tank. However, it’s important that your gauge is configured for the right tank size. Making sure that your gauge is setup for the right tank size is very important. This will determine weather or not your gauge is accurate when it’s installed onto the tank. In this article, I’ll be discussing how to ensure that your gauge is setup for the right tank size so that your readings will be accurate!
Tank Compatibility
The first thing that should be mentioned is tank compatibility. It’s important to know if the Smart Oil Gauge is compatible with your tank or not. Standard Granby and Roth tanks are the most common tanks that the Smart Oil Gauge is installed onto. Granby tanks are normally found in many sizes, but the most common sizes tend to be 275 & 330 gallon tanks. These tanks will normally have a 2″ NPT fitting for the gauge to be installed onto. If it’s not a standard 2″ fitting, you’ll need an adapter. I go into this in a bit more depth in this article here.
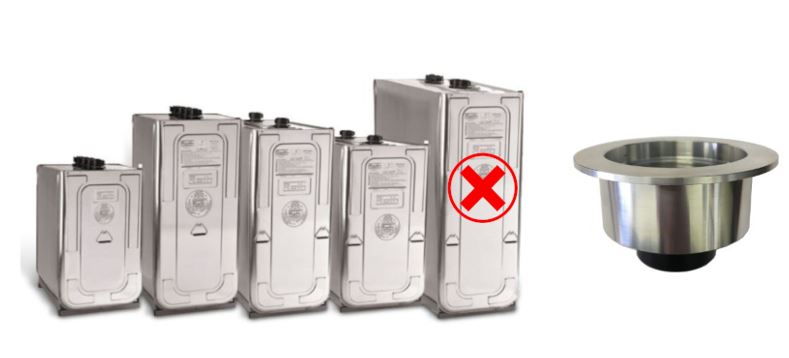
Meanwhile, Roth tanks are a bit more specific. The Smart Oil Gauge is compatible with all Roth tanks except 1500L tanks. This is because these tanks have an interior support baffle that will prevent the gauge from reading less than half a tank. Additionally, Roth tanks require an adapter for installation of the gauge. These adapters are very important for the Smart Oil Gauge. Without these adapters, the gauge won’t be able to send the signal properly and the gauge will always read as full. You can purchase the Roth adapter on our website. If you have a Duo, you’ll need the Duo adapter, but if you have a regular Smart Oil Gauge, you’ll need the standard adapter.

Setting up the Gauge with the Right Tank Size
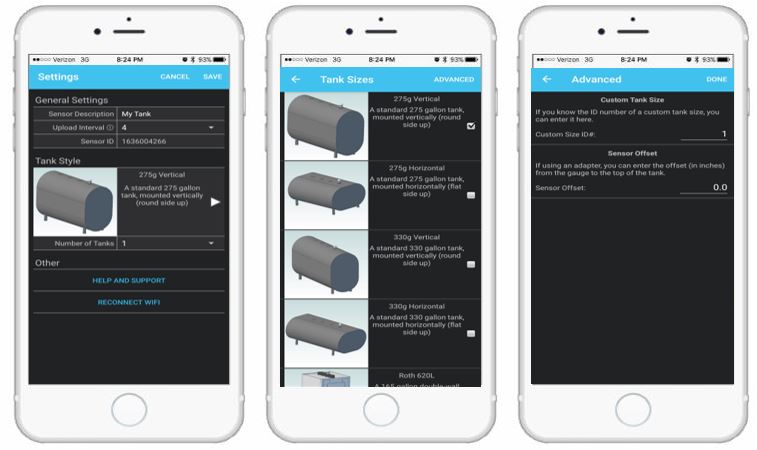
When you are configuring your Smart Oil Gauge, it’s important to know what tank size your gauge is setup with. Usually upon setup, the process will ask you what tank size your tank is based on various options shown on the app. These will consist of vertical and horizontal options for 275 and 330, Roth 620L and Roth 1000L tank orientations. If one of those is your tank size, then select it and the gauge will be able to read for it!
However if your tank is not listed on the app, then you’ll need to get a custom tank ID. You can contact our support line with your tank’s dimensions and we’ll be happy to program your tank size into our system! Once your tank size is programed, we’ll provide you with your custom tank ID, and the gauge will start to read for your unique tank size! You can reach out support team to get your custom tank ID at 203-456-1499 option 3 or email us at contact@smartoilgauge.com!
Correct Tank Orientation
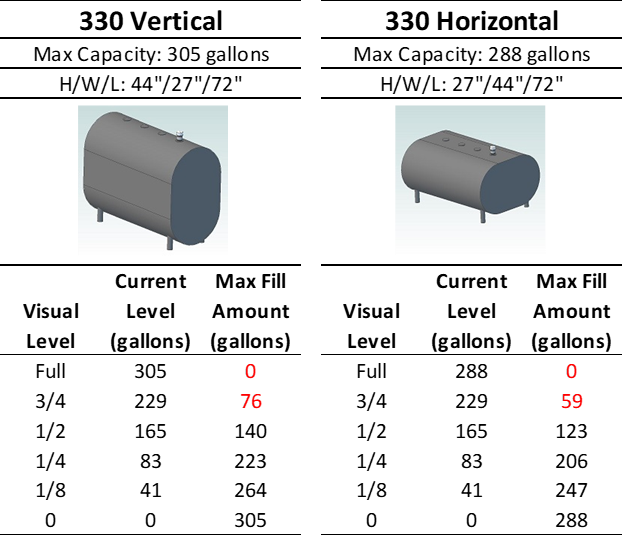
While this might not seem like it would have a bit impact, it does. Ensuring that your gauge is configured for the right orientation is very important. This can determine weather or not your gauge is reading correctly or not. You’ll want to know if your tank is oriented horizontally or vertically. Vertical tanks are usually round on top, while horizontal tanks are flat on top like a table. This will usually only apply to ovular Granby tanks. But, knowing what your tank’s orientation is can help the gauge read correctly.

In the off chance that your gauge isn’t configured for the right orientation, your gauge will be inaccurate. I have seen instances where clients have had their gauge set to read for a 275 vertical tank, only for their gauge to be a horizontal 275. This can often cause your gauge to read that you have half a tank of oil, but in actuality, you’re about to run out! So, it’s very important to compare your tank with the image provided on the app when setting up the gauge.
Changing the Tank Size in the App
If you already have your gauge setup in the app then you’ll need to change the tank size. To do this, you’ll want to start off in the screen that says “Tank Detail” on the top. Once you’re here, you’ll want to get to the “Tools” screen. This can be little different depending on if you’re using an Android or IOS device. For iPhone users, all you have to do is click on the gear on the bottom left, and it will take you to the “Tools” screen. But for android users, you’ll have to click on the three dots on the top right and select “configure”. This will take you to the “Tools” screen.
After doing this, you will be taken to a screen where you will see various options such as Tank Settings, Alerts and Sensors. Click on your tank under the sensors section and you will be brought to a screen where you will see various options such as Sensor Name, Upload Interval & Tank Style. Select “Tank Style” and it will take you a screen where you can choose between various different sizes. If you don’t see your size there, click on advanced on the top right and input your custom tank ID. This will allow the Smart Oil Gauge to read your tank accurately!

Ensuring that You Have the Right Tank Size
It’s very important to ensure that your gauge is reading for the right tank size and orientation. So be sure to double check what your gauge is set to and what your tanks dimensions are! They can really make a huge difference for the accuracy of the gauge. The last thing you’ll want is to wake up in the morning to a cold house during the winter!
If you’re unsure if the gauge is reading for the correct size, or are simply having trouble configuring the gauge, please let us know! Our support team is always willing to help get the gauge online if you are ever struggling to get the gauge online!
Happy Heating,
Hunter


