Setting up your Smart Oil Gauge is very important for its functionality. Without making sure that the gauge properly connects to the internet, it won’t communicate with our servers or the app. For your gauge to be able to work properly, you’ll need to make sure that the gauge is set. In this blog post, I’ll cover all the ways you can make sure that your gauge is set up properly!
The Smart Configuration Method
The first method that you’ll likely try is the “Smart Config” method. You can find this method by going onto the Smart Oil Gauge App and clicking on “connect sensor”. Upon clicking on this option, you’ll see that this method is asking for your WIFI network password. This is the WIFI password for the network that your phone is currently connected to. It’s important to note that when doing this method, whichever network that your phone is connected to is the network the gauge will try to connect to. So be sure that your phone is on the network that you want to connect the gauge to.
Once you’ve clicked on “connect sensor”, be sure to type in your WIFI network password and select continue. On this next screen, you’ll see a little animation that looks kind of like Mickey Mouse’s hand. This is demonstrating how to press the button on the gauge. The tall-thin black button that we’re referring to is located on the top right of the top board. Press the button twice and the gauge should start blinking twice a second, then press the continue button.

The app will then go to another screen where it will say “Beginning configuration process, please wait”. Simply wait for the gauge to connect to your WIFI and when the process is done, it should say “Config Process Complete”. It will then take you to another screen where you’ll be able to fill out all the information that you need on your tank! This will include tank size, upload interval, and the tank’s name.
If the app says “Configuration Failed” then try seeing if you can verify the WIFI network password to make sure that you’re using the correct password. If you are, try rebooting the router and trying again. The process should be able to be successful after rebooting the router. If it still fails, try the below processes and see if they work!
The Alternate Configuration Process
This process is a little bit different from the Smart Config process. Unlike the smart config process that takes you through the Smart Oil Gauge app, this process will take you through your WIFI settings on your phone. With the Smart Config process, the process is identical for IOS and Android devices. However, the alternate process is slightly different depending on what type of device you use. I will be covering those differences here.
The first thing that you’ll need to do is go to your phone’s WIFI settings. Once you’ve made it to the WIFI settings, make sure that the gauge is turned on. Then, press and hold on to the tall-thin black button once for two seconds. Try counting one-one thousand, two-one thousand before letting go. I’ve often found that this will help you get exactly the amount of button presses that you’ll need.
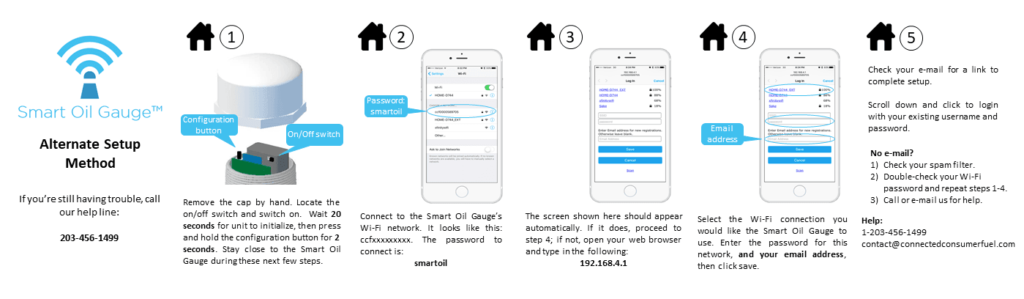
Once you’ve done that, the gauge should start flashing once per second and you will see a network pop-up in your WIFI settings that says “CCF######”. The numbers will depend on your gauge’s serial number but the network popping up is the same. This is where you will need to connect to the network on your phone. The password when attempting to connect is smartoil.
Now, after typing in the password, the process might be different depending on your device. If you are on an IOS device, the gauge should take you right to the login screen. However, if you have an Android device, it will say “connected without internet”. In that instance, you will need to go to your web browser and type in the IP address. In the search bar, type in 192.168.4.1, and your phone will open up to the login screen.
Once on the login screen, you should see your WIFI network in a list of other networks in purple. Make sure that you select your WIFI network so that it can autofill the SSID box. Then, be sure to type in your WIFI network password and email address so that the gauge can send you a registration email. Then, hit the save button and check your email for the registration email!
The WPS Method
The final method that you can try is the WPS method. Now, this method is usually a last resort because it’ll only work if your WIFI router has a WPS button. If your router doesn’t have a WPS button, then you will likely not be able to do this process. The WPS button usually looks like either a globe, lock, or two arrows chasing each other but it might even just say WPS on the button.
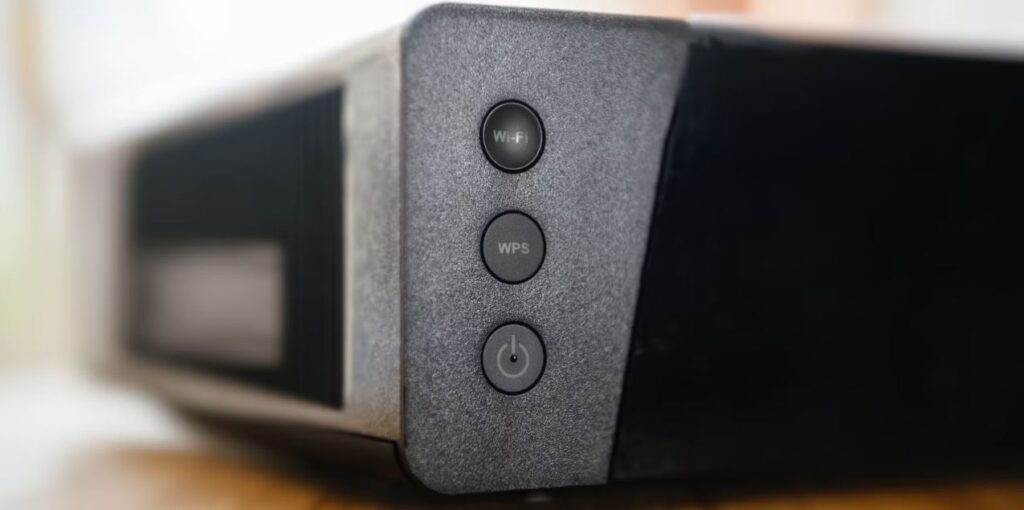
The first thing that you have to do is press the WPS button on your router and the router should start flashing. Once you’ve done that, press and hold on the gauge’s configure button once for three seconds (one-one thousand, two-one thousand, three-one thousand) and let go. The gauge should then start flashing three times a second before connecting to your router.
After successfully going through the WPS configuration process, simply go on your Smart Oil Gauge app and refresh the page and you should see the gauge listed there on the app!
Gauge Bandwidth Compatibility
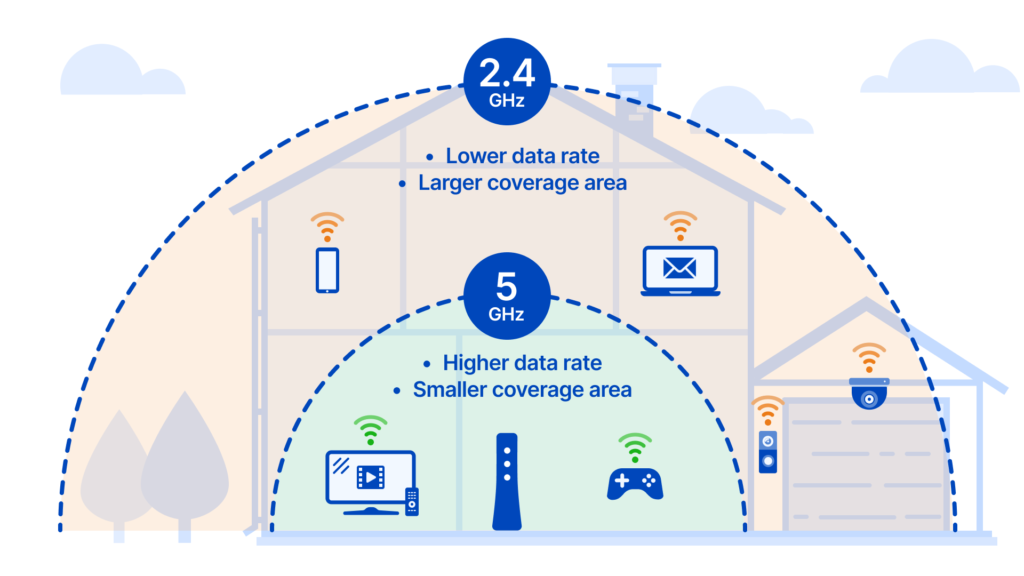
While most devices nowadays are compatible with 5ghz WIFI connections, the Smart Oil Gauge is not. Now, you might be wondering why we had gone with 2.4ghz rather than 5ghz. Well, the answer is very simple. While 5ghz is certainly faster than 2.4ghz, it doesn’t reach as far. That’s why 5ghz mostly finds use in streaming and gaming because those high-performance tasks require a faster speed to function properly.
Now with 2.4ghz bandwidths, they tend to reach farther than 5ghz. Most of the time, your oil tank is not going to be right under the router. It’ll usually be farther away in the basement or outdoors. For that reason, we chose 2.4ghz to provide the gauge with a strong signal that reaches farther than 5ghz networks.
If your network shares both 2.4ghz and 5ghz, we recommend you open up a separate 2.4ghz-only network for the Smart Oil Gauge. This will give the gauge a solid connection to connect to and will make sure that the gauge doesn’t disconnect if it switches to 5ghz. If you can’t open up a separate 2.4ghz-only network for the gauge to connect to, then I would recommend getting a WIFI range extender. This will give the gauge another access point to connect to the internet with, as well as being able to split the 2.4ghz and 5ghz bandwidths.
We recommend the following extenders, this TP-Link extender is a 2.4ghz-only extender, meaning that it will only extend a 2.4ghz signal. There is also this NETGEAR extender, which is a dual-band extender. This means that it will be able to extend both 2.4ghz and 5ghz bands separately. I have had some personal experience with the NETGEAR extender and never had any issues with it when I used it!
Conclusion
Making sure that you connect your Smart Oil Gauge to the internet is very important for its functionality. The device will need a stable 2.4 GHz internet connection for it to function on the network properly. We’ve outlined everything that you’ll need to know above! Getting the gauge online will ensure that it’s able to read and upload without issue.
If you’ve gone through all of these methods and have still yet to get the gauge online, then do not panic, our support team is more than willing to help! You can reach us at 203-456-1499 option 3, Monday through Friday from 8 am-5 pm EST. But when you call, just make sure you have your WIFI password, Gauge Serial Number, and account email address all handy to make the process go smoother!
Happy Heating,
Hunter

