There are a few methods to use for getting your Smart Oil Gauge setup. One of which is the WPS method. WPS stands for WIFI protected setup and is used to establish a secure connection between the router and whatever device you are pairing. However, not all routers and devices are able to use the WPS method. So in this article, I’ll be covering how to identify if you router has a WPS method and how to configure the gauge using this method.
The WPS Button
The WPS button is a button that is located on your router and is used to get your gauge into the WPS mode. This mode can be used to reconnect an existing device to your network if you’ve changed any of the credentials. It can also be used to connect new devices to your network for the first time. This button is normally located on either the front or back of your router, and it can take many appearances. Most of the time, the button itself will say WPS or it will look like two arrows chasing each other. However, depending on your router and ISP, it could look either like a globe or a lock.
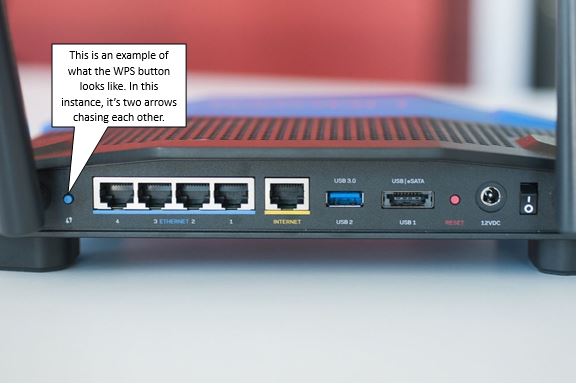
Pressing this button will cause the router to enter the WPS connection mode. This will allow your router to connect to devices in the same WPS mode. However, you’ll have to be quick because the router will only be in this mode for about 2-3 minutes on average. There is a little light on the front of your router that will typically start flashing once it enters this mode. This will notify you that the router is in the WPS connection mode.
But you might be asking, what devices you can connect using the WPS mode. Well, the Smart Oil Gauge is one of them! Similar our other methods, you have to press the button on the top right of the gauge in a specific way. I’ll be touching on that later on in this post. Surprisingly, cell phones and gaming consoles don’t offer a WPS connection. Most cell phones operate off of a simple WIFI connection, while gaming consoles can use either WIFI or ethernet connections. The most common devices that include WPS are smart TVs, blue-ray disk readers, security cameras and printers.
Setting Up The Gauge With the WPS Method
To setup the gauge using the WPS method, you will first need to bring the gauge over to your router. This will make the process a bit easier in getting the gauge setup. Like all setup methods, we recommend that you setup the gauge before you install it on the tank This will make the process of getting the gauge setup and configured much easier in the long run.
Once you have the gauge by the router, locate the WPS button and press it. You should see your router start to light up and flash. Once it’s starting to do this, you’ll need to press and hold on the gauge’s config button once for three seconds (count one-one thousand, two-one thousand, three-one thousand). This will cause the gauge to start flashing three times per second. Once the gauge is in this config mode, you don’t have to do anything! Just keep an eye on the blinking light and see when it stops flashing.
When the light on the gauge stops flashing, open up your smart oil gauge app and refresh the page. This will require you place your finger on the middle of the screen and swipe down (on IOS devices). For Android devices, there is a refresh button on the top right. Pressing this will refresh the page. But make sure that you are on the same network that you are trying to connect the gauge to so that the app can pick up the gauge on your router.
What to do After the Gauge Shows up on the App?
After the gauge has showed up on the app, you’ll want to select it from the “My Tanks” screen. You will then be brought to the tank detail screen where you’ll now need to get to the tools screen to input your tank’s information. You can access the “tools” screen from the “Tank Detail” screen. On the bottom left on IOS devices, you see a little gear, click that and it will take you to the “Tools” screen. But if you are on android, click the three dots on the top right and select configure to make it to this screen.
After making it to the tools screen, you’ll want to click “Tank Settings” on the top. This section will ask you for your address, zip code and other details. While the address is optional, the Tank name and Zip Code are required. Filling out the address will allow you to order oil from FuelSnap directly from the app. However, this feature is optional! So if you wish to stick with your existing dealer, then feel free to do so!
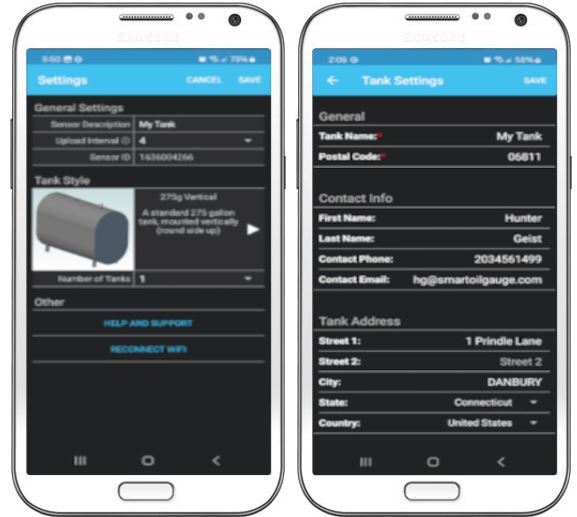
In the “Sensors” section, this will allow you to change the upload interval and tank style that the gauge is reading for. It is VERY important to have to correct tank size for your Smart Oil Gauge. Without the gauge reading for the correct tank size, it will not read your tank accurately. If your tank size is not listed on the app, then simply reach out to us via email or telephone and we will be happy to configure the gauge for the correct tank size.
What To Do if None of these Work Out
If you’re unable to get the gauge connected and setup using the WPS method, feel free to reach out to us with the gauge’s serial number! The serial number is located on the inside of the cap and is the long all-numerical number. With the serial number, we will be able to find out if the gauge was ever able to connect to the internet or not!
You can reach our support team at 203-456-1499 option 3 from 8am-5pm EST, Monday through Friday. If you can’t reach us by phone call, shoot us an email! You can send us an email at contact@smartoilgauge.com!
Happy Heating,
Hunter

